Yesterday we had a long, but rewarding day in the garage. Now that the front of the car has been painted, our attention has turned to finishing off a lot of loose ends in the front of the car.
First up, off with the front body work. It's been a long time since we've had this off, so it warranted some photos.
Next up, we bolted the front frame in properly (we'd unbolted it for painting and were using odd spare bolts). Recently I bought a bolt set. This is the best $120 I've ever spent. Unfortunately there are no bolt shops in the area that are open on the weekend. So since we started building this car our normal method of procuring bolts has involved driving to Supercheap/ Autobarn/ Repco and getting ripped-off big time for 2 bolts in a Champion plastic-pack that are normally the wrong size. Now we have a full selection of bolts there will be no more wasting time and money getting bolts. Why didn't I do this 2 years ago?
The next job involved securing the coolant lines. We never finished securing them after we ran the coolant lines (too keen to start the engine). We wanted to get the coolant line rubber away from anything it could rub on. Tim spent some time looking at this a few weeks back and came up with this awesome idea of making a hanger off the round K-frame bracing tube. A quick bit of welding and drilling and I was done. Very happy with the result.
Tim recently bought a Rivnut (nutsert) kit and was keen to test that out so he mounted the brake reservoirs.
Another job was to make up some spacers between the top of the K-frame and the chassis. For some reason, the manufacturer leaves a 20mm gap here. I think it is so you can adjust the chassis alignment. The previous spacers were very flimsy. Tim welded two bits of 10mm plate steel together. Job done. Pics coming.
So all-in-all, our long session in the garage was rewarding. Hopefully we continue to have sessions like this.
With the muffler out of the road, it's time to return to the steering column and the painting of the front frame and steering area. The steering column needed another mount added. I got part-way through this job months ago and then realised it would foul the windscreen wiper arm. After fixing that I got distracted by the muggler. It's good to finally get the steering column sorted.
Tim came around on Monday and painted it all. It looks much better.
In the meantime, Tim has been continuing on with the brake lines. This is an endless task, but looks great.
The other day I was driving home and spotted a GT40 in the front of Motorsport Accessories, a local shop. I had to go in and check it out. It turns out that it's a well-used race car with a string of trophies to its name. It's running a Ford Cleveland stroked to 363ci (I think) with solid lifters and fed by a Holley carb. It's very nice to see a GT40 that gets used on the track and is still street driven.
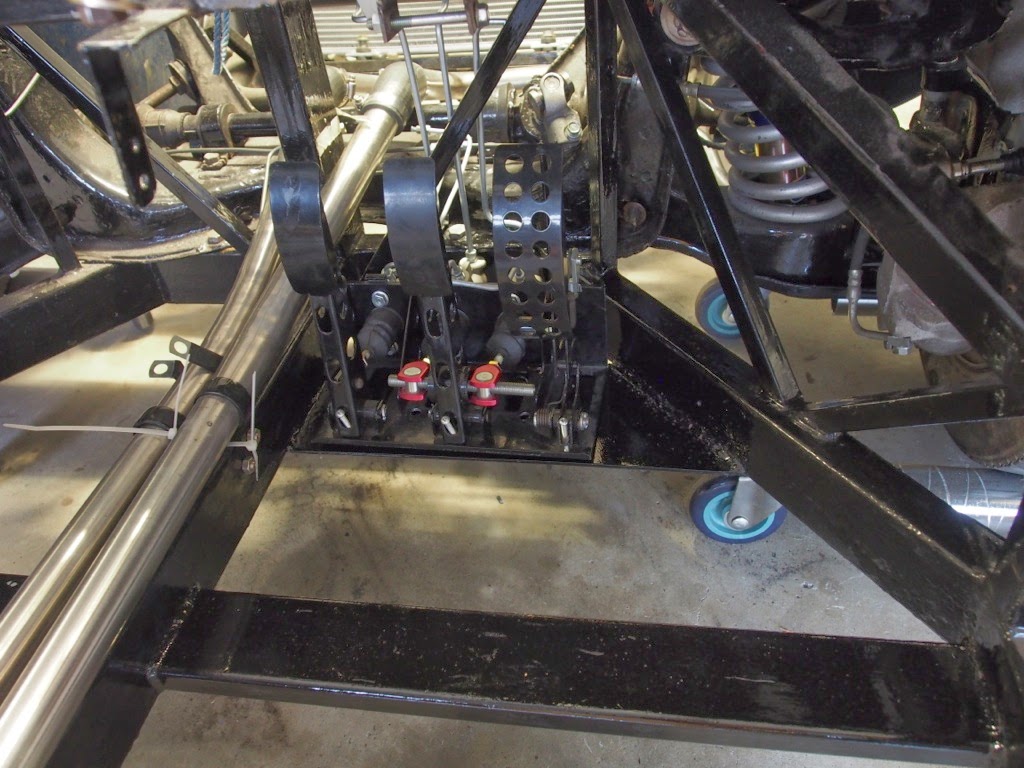
Some time ago Richard Knight from gt40s.com asked me to take some photos of the gearshift linkages since he is building a similar kit. Here you go Richard, sorry for the delay..
Tim and I spent half a day working on the GT40 on Saturday. It's always good to get in the garage and make some progress, even if it just for half a day. Currently we're working on brake lines and the muffler mounting. Tedious jobs, but progressing none the less.
Brake Lines
Tim has been ticking away at this job for quite a while now. It's all coming together and will look awesome once the lines are all braced. This has been a very frustrating job for Tim, but I think he's though the bulk of it. On Saturday he was able to put fluid in the reservoir for the front callipers to check for leaks. As expected, there were a few, but he was able to fix them and see movement in the callipers :)
No doubt you've noticed the orange cable. This is the battery cable. We've decided that we'd like the battery at the front of car for weight distribution and tidiness. The cable is double-insulated welding cable that my mate Jason Broadhurst picked up for us. He's terminated it at the starter motor and started routing it through the chassis. However, we're not really sure where we want to run it: down the side or down the centre? For now, I think we'll leave it loose until we start panelling and can see what's going to work best.
Muffler Mount
The rear muffler mount is done. It just needs painting. Last week I bent a steel flat-bar strap for the muffler to sit on. This week I spent time setting the muffler's position and then welding eyes to the flat-bar so that it bolts to the gearbox. Setting the position of the muffler took quite some time, because I wanted to get it right since the muffler is so visible from behind the car. I'm pretty happy with how it's turned out. We were originally planning to have 2 mounts, but it's very rock solid now. The pipes support the front of it very well. We're not sure if it's worth the effort to make another mount. Particularly since there aren't any easy bolts to attach a bracket to at the front of the gearbox.
The Garage
I thought I'd take a few more pics of the garage for the guys at The Garage Journal.
This little trolley has been absolute gold. My wife picked it up from her old work. They were going to throw it out. Now it holds a lot of scrap offcuts and is perfect doing odd jobs on, welding on or for putting tools on.
The shelves had another clean-up. Still a work in progress.
I installed a new shelf above the bench to hold random stuff. It worked out well.
Quite a few things have happened since the last post. Firstly, let's talk about the garage. You may have noticed from my previous pictures that the garage was turning into a bit of a mess. I really was lacking storage space. Not only this, but with a new baby and summer coming on, my wife was starting to get sick of her car being out in the Sun.
When we built our house, one of the best things we ever did was specify an extra 1.5m on the side of our garage (7.5m x 6m). So I came up with a hair-brain idea of fitting all 3 cars in our 2.5 car garage by making a shelf down one side that the GT40 would slide under (notice the new go-jacks in the picture above). Everyone told me that this would not work, so I was determined to prove them wrong. First, time to clean out the old shelves...
Thanks to my mate Jason, I picked up some old pallet racking from a warehouse that was down-sizing. Notice the middle leg has been removed (rear leg is braced to wall) and the height is about 40" + 2 ;-)
Yep, GT40 fits under there perfectly. Now we have heaps more storage room. I'm really happy with how it has turned out. Much better!
OK, so now the garage was re-arranged. I had an itching to get back into home brew. A home brew setup popped up cheap in the neighbourhood. Included a converted chest freezer, 4 kegs and a load of gas lines. So the conversation to the wife went like this.... "I'd like to get a home brew setup", the reply "if you can fit it in the garage it's a deal". Sounds like a challenge to me! Yep it fits (just)
Job done. 3 cars in a 2 car garage, plus a home brew fridge, a workbench and a pile or storage space.
On with the car already!
OK, enough talking about the garage. Let's talk GT40s. So late last year a new muffler arrived :) We were determined to get rid of the poxy mufflers on each side and go to a proper twin tip in the centre setup.
Yep, that looks MUCH better.
Damn, she's a big sucker! The mounts here are just a proof of concept.
As much as we'd like to build a proper 180 degree "bundle of snakes" exhaust system, we all know it'll take us 6 months and many headaches. So this'll do for now. Gets us closer to driving this thing. Tim picked up a few 2.5" bends and away we go.. Our TIG welding skills are improving, but we still have a long way to go. Oh yeah, you may remember that I have an Arduino-modded TIG welder. Well a few months back I programmed in a pulse function. It seems to have improved the welds :)
So, how does it sound? Pretty damn good! This video was taken at my Daughter's Christening after-party. The men had defaulted to the garage where there is home brew and a GT40. Needless to say, the car was gonna be started and it was gonna see some RPM.
It's still probably too loud for roadworthy, so we'll to do something about that, but it's getting closer. There are a few exhaust leaks around the connection to the muffler, so we'll be sorting that soon.
What else has been happening?
Since then, Tim has been doing most of the work as I've been pretty busy with the family. I managed to escape to the garage last week and do a bit of work. The muffler was sitting on a "proof of concept" cradle. I wanted to bend the flat bar to match the shape of the muffler. I was trying to figure out how to bend the flat bar with the gear I've got. After scrounging around, I managed to do it using an old brake disc. It worked perfectly. Clamp the brake disc in a vice, bend the bar around the hat part.
Meanwhile, Tim has been working on brake lines and the gear shift linkage (which now works). Pics coming soon.