Sunday, 11 November 2012

Engine In!

This post comes to you from the departure lounch of the Brisbane Airport. I spent most of October on an offshore drilling rig in Thailand, had about 10 hectic days at home and then it's time to head back. We have made some progress, so I thought I'd give you all a quick update before I disappear into the internet black hole for a few weeks.

This is what I came home to. Oh yeah! Dad and Tim dropped the engine in. It took them all of an hour and a half apparently. They picked up an engine crane from the rental shop, drove home, assembled in, dropped in the engine, disassembled the crane and returned to the rental shop in an hour and a half. The guy at the shop asked if they had changed their mind. Haha. "Nope, it's done mate"
 

The flywheel machining was done on my driveway thanks to Mobile Flywheel Grinding. He reckons the flywheel was in pretty good nick, but he said he'd never seen a flywheel setup like ours before. Hehe.

The front suspension arms are finally back from Fulcrum Suspension Stafford. I left them there for the 4 weeks I was in Thailand. Here's the front suspension partly assembled.


I seem to have spent a large amount of time cleaning the gearbox. Anyone who tells you that dilute Hydrochloric acid is a good alloy cleaner, ignore them... I tried dilute acid and whilst it looks like it's doing a great job, it just seems to leach a dark grey liquid out of the metal that leaves grey stains all over it. I ended up going for a metal polish (Bowden's Own) and using elbow grease. I'm pretty happy with how it's come up.


Anyway, that's my boarding call. Gotta go.

Saturday, 29 September 2012

A Major Milestone!

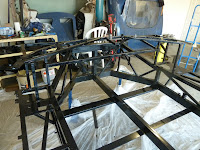
Well last weekend we reached a major milestone! Yep, we finally painted the chassis. Tim had the week off Uni and he devoted most of that week to working on the GT40.

Painting the chassis has been something we've wanted to get over and done with for a long time. Now we can finally move forward and start installing things. Here are a few pics of the process...

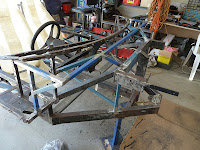
Here's how it looked in November last year.


Tim spent a few days cleaning it up. My wife Kristen mentioned a few times about the amount of angle grinder dust blowing into the house. I promise, this is the last of the dust...

Tim even put it on dolly wheels and pushed the car down to the lawn so he could hit it with the Gurney. Apparently a young kid and his Mum walked past. The boy made the comment "Look Mum, they're building a boat". Hehehe


After cleaning Tim got stuck into the underside. Not a fun job...


And here's the finished product... It looks fantastic. The new bracing makes the chassis look much more substantial.


Meanwhile, we also painted the engine. We ended up deciding to paint it black with aluminium parts for exhaust manifold, intake, carb and rocker covers. Pretty happy with how it's turned out. I just chucked an exhaust manifold on to see how it looks.


Jim has also updated the 3D model to match our new chassis changes and to show the panelling plans. I think it'll work out great.


So next up, is to get the engine back in place and start sorting out things like coolant lines and fitting new suspension. All good fun.

Unfortunately, this will be my last update in a while. I've got to head away with work :( I'm sure Dad and Tim will continue work while I'm gone.

Thursday, 13 September 2012

Motivation!

Sorry it's been a while since my last update. Things have been quite busy for us all and we've missed a few weekends recently, but work has still been progressing when we get a chance. The most exciting thing to happen over the last few weeks was the reinstallation of the body. OK, it was only temporary (to check out chassis clearance), but it was very motivational and brought back memories of how this thing looked about a year ago. Check it out...


I couldn't help myself, but climb in.


It looks way better now that the chassis has the extra bracing. The main reason for putting the body back on was to measure the clearance behind the bulkhead. We're planning to replace the C-section for the door locks with some 25mm box section that follows the shape of the body.


More Welding
We've also done a bit more welding recently. First up, added new seat rails that line up with the new seat rails, then added some cross bracing in the front.


I'm also contemplating if to add bracing in the front sides. Here are the two options. I think the 2nd option is going to add more strength. The first option won't really do much for bracing.


So welding is nearly complete. Tim has a week off soon, so we're hoping we'll have the chassis ready for painting during that week.

Suspension Painting

Whilst Dad has been working on the engine and I've been welding, Tim has been getting on with painting the rest of the suspension parts. The latest is the rear trailing arms and steering rack. The beauty with the KBS paint is that it's self-levelling and can be brush painted. Tim did a coat of Rust Seal on Saturday and asked me to do a coat of KBS Black Top (UV blocker) on Sunday. I thought it was a perfect opportunity to get some practice on my spray gun. Unfortunately, this was a bad idea, I ended up with bad orange peal (rippled surface). I put this down to the fact that I had no idea what each of the knobs on the gun do.

So after some Googling, I learnt how these guns work and headed back to the garage. I gave the parts a light sanding, then hit them with a coat of Rust Seal. This time, I took the time to test the gun on a piece of cardboard and to set up it up properly. I don't think I was getting good atomisation before. Possibly because I didn't use enough thinner. So 2 things, I can recommend to newby painters like me:

  1. Test the gun on cardboard before spraying. There are lots of good sites on the web that show what the test patterns should look like and how to identify problems. Play with each of the knobs and understand what each one does.
  2. Use the correct amount of thinner as directed by the paint manufacturer.
After all that, here is how it turned out. It could always be better, but at the end of the day it's just suspension parts and we're not building a show-quality car. As long as they are rust free and sealed. Despite the time spent sanding and repainting, this has been a great opportunity for me to learn how to use the spray gun. No doubt these skills will prove handy again.


The Engine

On Saturday I went out for an hour or two and left Tim and Dad at home. I came home and was greeted by this (pretend it doesn't have plastic on it, I forgot to take a photo)...


Yep, the inlet manifold and carby are on now. It looks mean! Can't wait to hear it running. Tim's ordered the rest of the parts to finish it off. We'll give it a coat of paint soon, too.

Monday, 13 August 2012

Gaining Momentum

Well, it's been quite a few weeks since my last update, but rest assured, we have been quite busy and have certainly been enjoying the project. First up, Tim had a week off Uni and managed to get a few small jobs out of the way, like rebuilding the carb. He also purchased some steel and started to get stuck into some chassis improvements.

You may remember in my last update that we were reassembling the engine. A few people recommended that we check for the 'secret' oil gallery plug below the rear main seal. Dad drew the short straw and took the time to remove the sump and check. Fortunately we found it was already in place. Thanks for the heads-up guys. It's good to check these things...

Chassis Improvements

Now on to the fun stuff... The main aim here is to improve rigidity of the chassis and to make the panelling look better. For those who forget, this is what the panelling used to look like...


First job, was to install cross-pieces under the footwells This is a real hollow section of the car.


Next up, rear bulkhead supports and a cross bar that may eventually be used as an anchor point for racing harnasses ;-)

Following that, our attention turned to the section in front of the windscreen. After studying other GT40 chassis, we decided to square off this section with a new cross bar in 20mm box section. The plan was to cut a panel to shape and sandwich it below the windscreen (bolts down on the curved piece). However, we discovered this will be a bit tricky since the curved section also bows upwards, as you can see in the second pic. I guess this is to match the shape of the fibreglass body, so we're reluctant to tamper with this too much. We're still deciding what we'll do here. Either a. maintain a panel that is parallel with the blue bar and sits below the curved bar or b. use a thin sheet that can be shaped to sit on top of the curved bar. For option a, we would fibreglass the area below the windscreen to tidy it all up nicely. Yet to decide on this one...


Righto, so this is the idea for the wheel arch. Quickly mocked up out of cardboard and wood by Tim. We're also allowing space here for fuel fillers to be installed on each side, as per the original GT40s. It'll look awesome.


We've also been discussing pedals a fair bit. The old set up used a pedal box from a VW (we think). The previous owner was a tall guy so he needed the pedals as far forward as possible. Hence, the front of the chassis had been cut out to fit this pedal box. It doesn't look overly strong (you can see the cutout in the front shot above). We really can't go past floor mounted pedals like the OBP ones below. Since we're all short arses, we can get away with moving the pedals a bit closer to the seat.


Tim testing out the driving position. Check out the extra bracing in the side pods.


I emailed our ideas to my mate Jim and he updated the 3D model to play with pedal positioning.


Time to Call in Some Brute Force..

Now Tim, Dad and I are very much amateurs when it comes to welding, so we'd just tack welded everything into place. Fortunately, my Father in law, John, has over 30 years experience and loves to get his hands dirty on anything with an engine (particularly if it's a Chevy). He was down from Townsville during the last weekend and put in some serious hours in the garage! What a legend.

John at work..


Some shots after the clean-up. Not only did he finish off all the welds we'd tacked, he also fabricated some of the tricky angled members in the front and fixed a few other issues. The welds look awesome. John does some seriously nice work. Thanks very much mate.


John also adjusted the curved bar by rising it at the ends. You may notice in the pics below that there are tabs welded on top of the bar towards the ends. These look like they were added in a hurry to raise the body at the edges. John cut and raised the curved bar instead. This will allow us to cut off the tabs and bolt to the curved bar directly. Much better...


Once when John was visiting last year we removed the K-frame. This job was made a whole lot more painful, because the front anchor bolt had been welded in to the chassis and was too long to be able to lift the K-frame up and over the top. The only solution was to cut it. John has now fixed this by welding a nut in instead, so we can bolt downwards to anchor down the K-frame. Also notice that John fixed the pedal box cut out. This just keeps getting better :)


 It's looking good from this view.

Suspension Painting

On Saturday, John had pretty much taken over the chassis, so Tim and I got on with other things. There was too much dust in the garage to do any engine work, so Tim worked outside and got stuck into painting the suspension parts that had been sitting waiting for a while. We were thinking of powder coating these, but it's quicker to do ourselves in an afternoon. Here's the finished products.


Seat Rails

While John and Tim were busy, I finally got around to mounting the seats on rails. I purchased rails from Autotecnica quite a while back, but haven't had a chance to get to them yet. They're quite low profile, so should work nicely. I mounted some steel bar inside the seat to bolt the rails to. I'll need to weld the bolts in properly, paint the flat bar to prevent it rusting and then tidy up the fibreglassing. They slide quite nicely, so that's a good start.


Some Motivation..
While looking at photos for this blog update, I discovered these old ones from when we first bought the car. It may have been a bit rough, but it's still one damn sexy car that will one day run again...