Saturday, 3 January 2015

More Panelling Progress

I thought I would share some more pics of the panelling process. In the hunt for pictures, I found these gems. Tim tightening the driveshaft bolts a few weeks back. Sometimes it pays to be a short arse.


So on with the panelling. Tim and I managed to have a good session on the car on New Years Day. Here are some pics of the process.

First up, we make the panel out of card. This takes ages for a complicated panel.


Next we transfer the template on to the aluminium. We've started using ballpoint pen on the Aluminium. Generally it works pretty well. It gives a nice thin line, but can be a little bit tricky to spot when cutting out the panel.


Next we cut out with a jigsaw. We've glued some vinyl to the underside of the jigsaw to stop it scratching the aluminium. We also use a bit of WD40 to help it slide.


After that it's off to the bending brake. We have an 800mm one. I keep forgetting to take pics. This complex panel wouldn't fit for this bend, so I had to make a DIY bending brake.


In the end it worked out pretty well.


However, there's one problem... We never realised this would leave a very large gap between the panel and body shell.


Previously the front of the car looked like this. There was no inner guard at all! The road grime would have flicked straight into the front of the door. That would explain why the doors are so dirty in that region. I guess this is one the many downsides of an old GT40 kit.


The photo below shows a modern kit. This one in particular is a GT Forte (thanks to Andrew on the GT40 forum). 


Notice the outer edge of this wheel arch panel extends further outwards than ours. I still haven't figured out if these panels seal against the hinged body on a modern kit or if there is always a gap. We'll have to give some thought about how we fix this gap on ours. I guess we have the options of extending the steel work further and making new panels, making an extra aluminium panel that extends into this region or fibreglassing a guard into the body work. You'll see what I mean about this in the pictures below.

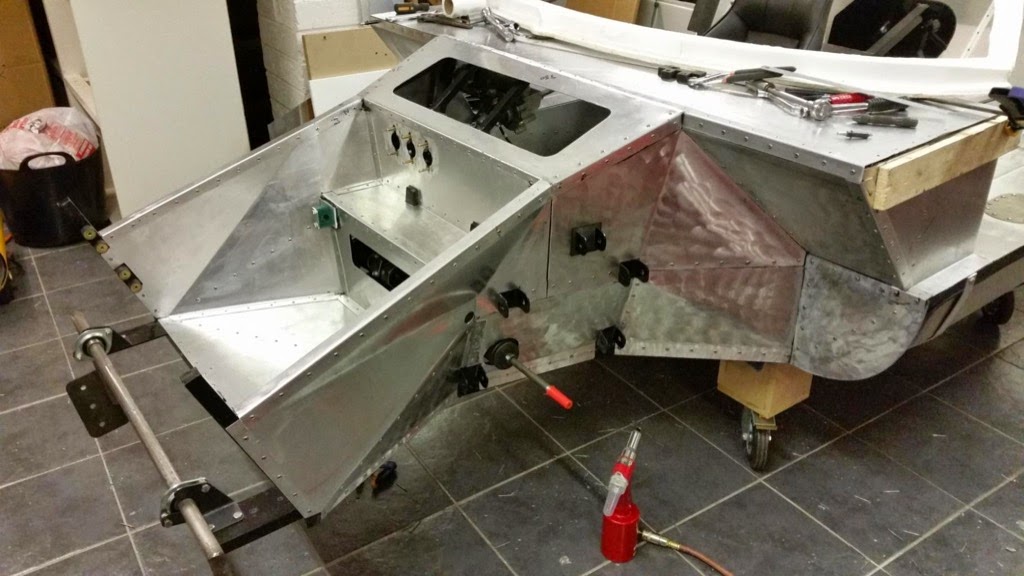
Anyway, moving on... Here are some more pics of Tim's work on Thursday. He's finished off all the driver's side panels.


On Friday, Tim spent another day working on the car (unfortunately I had to work). Tim tackled the large panel in the wheel arch (behind the one shown above). Unfortunately Tim packed the car away before I could take photos. Here are a couple I squeezed through the wheel arch.


I'm pretty happy with how this has worked out....


The blue piece is attached to the hinged body work. On our KCC kit car, the body panels have inner wheel guards already fabricated in fibreglass. This is what you can see in blue above. The bonus of this is that you don't need to encase the whole front end in Aluminium. The blue fibreglass in the picture above was trimmed back quickly when we did the steel work. I'm quite happy with how this has mated up to the aluminium panel. It'll need a bit more tidying at a later date, but it's a good start. One option would be to do something similar for the panel behind the front wheel.

Anyway, that's enough from me. 

Thanks for reading.

Friday, 26 December 2014

End of Year Update

It's time for a quick end of year update. Work has been slowly progressing over the past few months.

Front Brakes Fitted

First up: front brakes. The brake kit has turned out really well and fits nicely under the wheels.

For a bit of a laugh, Tim gave the wheels a quick clean and polish. Yep, we know they're ugly. They will be replaced one day. It was surprising to see how well they cleaned up. I don't think this car drove many kilometres in its past life.


Brake and clutch pedals now have non-slip pads.


Aluminium Panelling

Now it's time to turn the corner with this build and start the aluminium panelling. This is something we've been looking forward to for a long time. It really will make the car look a lot more complete. We picked up a sheet of 3m x 1.2m of 1.2mm sheet. A big thanks goes to my mate Harley at All Inn Brewing Co for assisting us with a truck to pick up the Aluminium sheet. 

So here's the progress so far. Tim and I are still getting used to working with Aluminium, so we've chosen a few easy panels to start with. I picked up a bending brake ages ago and now it finally sees some work. It will be awesome to see this panelling finished.


Tim recently started riveting some of the panels. The brand new rivet gun failed after 10 rivets! Time for an upgrade...


In other news, we finally have the rear left stub axle back with a repaired thread. About time! This means we can fit the other drive shaft. The rear brake pads are also here, so once the panelling is done we might finally be able to drive the car down the driveway. Hopefully that'll happen in 2015. Fun times ahead!

Sunday, 14 September 2014

New brakes!

Good news. An upgrade kit has arrived for the front brakes. Tim and I spent a fair bit of time a few months back trying to get BA Falcon PBR callipers to fit. We tried a few discs and mocked up a calliper mountain. We had something that looked like it would work with modified VT Commodore discs. It was super-tight in the 15" wheels. Just when we were about to order parts and start to design calliper mounting plates, we stumbled across this kit on ebay at a good price. It's for a Ford Cortina. For the amount of messing around we'd have to do to DIY this, we jumped on this auction.


The seller (free plug for upc.online) was excellent and agreed to drill the hubs and discs in 5 x 112mm PCD (to suit current wheels) and 5 x 114.3mm PCD to open up more wheel options in the future. The kit arrived this week and looks like fantastic quality. I just did a quick test-fit this afternoon and it fits perfectly (except the wheel studs are different thread).


Damn happy with the result.

They make the wheels look even more crap.


Other than this, work has been fairly slow over the past few months, but we have managed to finish a few jobs. First up, the throttle cable is done. We decided to run it under the engine as this keeps it away from the exhaust and gives a nice radius bend.


Secondly, the clutch slave cylinder has been fitted and works. Tim bled it himself using the yellow strap in the picture above. Haha


Thirdly, I've knocked up a bracing for the alternator mounting bracket. There was far too much flex in it before, so I've braced it back to a bolt on the head. It still needs tidying up and painting.


During one of my stints in the garage, I couldn't help but introduce Bianca to the GT40. Gotta start em young...


Sunday, 6 April 2014

Epic Fix-Up Day

Yesterday we had a long, but rewarding day in the garage. Now that the front of the car has been painted, our attention has turned to finishing off a lot of loose ends in the front of the car.

First up, off with the front body work. It's been a long time since we've had this off, so it warranted some photos.


Next up, we bolted the front frame in properly (we'd unbolted it for painting and were using odd spare bolts). Recently I bought a bolt set. This is the best $120 I've ever spent. Unfortunately there are no bolt shops in the area that are open on the weekend. So since we started building this car our normal method of procuring bolts has involved driving to Supercheap/ Autobarn/ Repco and getting ripped-off big time for 2 bolts in a Champion plastic-pack that are normally the wrong size. Now we have a full selection of bolts there will be no more wasting time and money getting bolts. Why didn't I do this 2 years ago?

The next job involved securing the coolant lines. We never finished securing them after we ran the coolant lines (too keen to start the engine). We wanted to get the coolant line rubber away from anything it could rub on. Tim spent some time looking at this a few weeks back and came up with this awesome idea of making a hanger off the round K-frame bracing tube. A quick bit of welding and drilling and I was done. Very happy with the result.


Tim recently bought a Rivnut (nutsert) kit and was keen to test that out so he mounted the brake reservoirs. 


Another job was to make up some spacers between the top of the K-frame and the chassis. For some reason, the manufacturer leaves a 20mm gap here. I think it is so you can adjust the chassis alignment. The previous spacers were very flimsy. Tim welded two bits of 10mm plate steel together. Job done. Pics coming.


So all-in-all, our long session in the garage was rewarding. Hopefully we continue to have sessions like this.