Thursday 24 June 2021

The engine runs (again)!

As mentioned in my last update, the car has pretty much been sat dormant while I've been busy with work and my GTR.

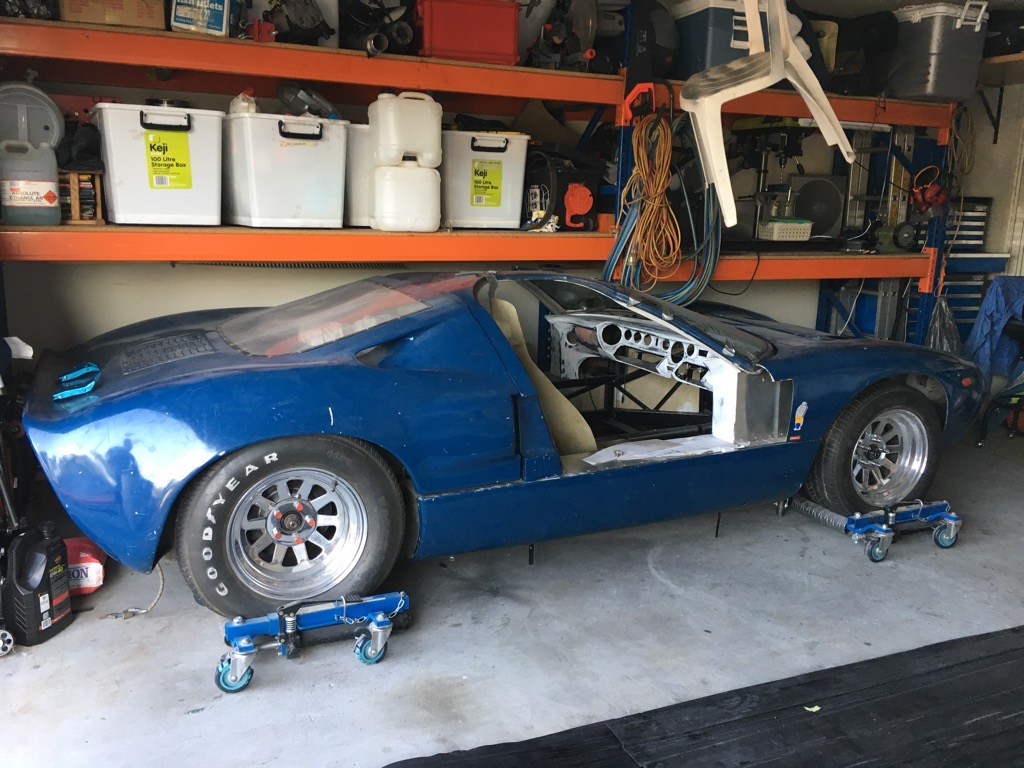
A couple of weeks ago, the stars aligned and I found some time to pull out the GT40. Here's how she was sitting... Yeah there's not much room next to the GTR.


Anyway, so it took me about 30 mins to remember what I was working on and where the cardboard templates fitted. Haha


Ah yes, that right. I need to make the top section of the firewall. CAD time...


And cutting time


After much trimming and refitting, I was pretty happy with it.


One thing that's been bugging me is how to attach the stainless to the fibreglass shell. The shell actually has some adjustment bolts up against the steel frame that adjust the alignment with the rear clamshell. So the fibreglass cabin and the aluminium panel need to be able to move. A trip to Clark Rubber found the solution. Perfect!

In the meantime, I managed to source a new glass panel from Roaring Forties. I had a good chat with Robert Logan who runs the company. What a good bloke. He packaged it up perfectly and send it to me quickly.


A comparison of new and old..


Back to the engine

A couple of weeks ago, my mates Jason and Tai came over with the goal of running the engine again. It hasn't run for 3-4 years since we removed the mechanical water pump and installed the EWP. Jason and Tai are pretty bloody good with wiring looms and in no time, they knocked up a test loom with a Deutsch connector so I can quickly plug in the EWP controller and start the engine when needed.

While they did the wiring, I reinstalled the EWP and piping with Dad. Then after much messing around (and a new battery), she started again! So good to have it running again. There were a few coolant leaks to fix and we ran it up to 95 degrees. We need to source thermo fans at some point soon.

Phone cameras never do engine sounds justice.

https://www.youtube.com/watch?v=6z3cu5ptI3o

So what's next?

Now that we are finally working on it again, I hope to keep momentum going. First up will be finishing that rear firewall and then I'll probably continue making more panels around the insides and the pedals (that will be a fun one).


Rear Firewall

Wow, it's been more than 3 years since I updated this blog. And unfortunately, that's because not a whole lots has happened...

But all is not lost. Let's rewind to 2019, where I last found a few days to work on it..

I started tackling the rear firewall. Started with CAD (cardboard aided design - for those of you who don't watch Project Binky).


Some cutting and bending (which involves coming up with creative ways of bending aluminium)


First side done..

Onto the next side. Rinse and repeat.
CAD..

And we're done. This looks simple enough, but takes bloody ages.

And that's where it sat for a few years! Yep, a few years crept past. Admittedly, I pretty much did a partial restoration on my GTR.

Thursday 22 February 2018

Rear firewall supports and central tunnel

On the weekend I found some time to work on the GT40. My mate Raj came over to give me a hand. He is the man who originally found the car for me back in 2011 and it was great to catch up with him. Raj tells me that he still regularly sees Richard, the original owner of this car. This is great news. I'll have to catch up with him.

Anyway, here's what we got up to.... the rear firewall and central tunnel.


With the changes to the engine pulleys, water pump and alternator we only need a small raised section to allow clearance for the belts etc. Here you can see the blue steel we have added. The intention is that a removable panel will attach in the centre between the two blue bars. The remaining aluminium sheets will bolt to the black painted bars.

Since this needs to allow for a central tunnel, I fabricated the supports for the sheeting which will box in the coolant pipes and other services. Here are a few pics.


All in all, I'm quite happy with the result. The next job will be to finish the welds, mount the handbrake and then fabricate the rear firewall. All in all, I'm pretty happy with how it's looking. It will be very nice when all the aluminium panel work is behind us.

Sunday 21 January 2018

New Shiny Stuff

Just a pic to remind us how good these things look. 


It's been a few months since the last update, but we've managed to have a couple of sessions in the garage. Keen eyes may notice different castor wheels under the rear. The old ones were disintegrating and I managed to source some nylon castors to bolt in. Very disappointed with the quality of these go-jacks. One day, I'll have a better system to get the car in and out from the under the shelf. Castor wheel carnage below...


Anyway, enough ranting about the go-jacks. Since my last post, a few more goodies arrived. 

Air Filter

We finally have an air filter. I'm pretty happy with how it looks and it fits well inside the rear window.


Alternator and Rear Firewall

Next, the new alternator and crank pulley arrived. Unfortunately, nothing is truely "bolt on" with a kit car. Whilst the alternator attached to the engine easily, it fouled on the one of the rear angled bars. Out with the angle grinder... We made the decision to chop it out, because we've added a fair bit of extra bracing in the rear and all other GT40 kits I've seen do not have these bars.


Here you can see the problem...


Last weekend, Tim and I managed to spend half a day in the garage. Tim got stuck into the rear bulkhead, while I worked on the fuel fillers. You can see Tim's chopped the second bar out and welded in a bar across the bottom to bolt the aluminium sheet to.


Yesterday, I finished it off and removed one of the coolant lines to lengthen it.

Fuel Caps

The original fuel filler for this car was under the rear clamshell near the hot exhaust. What could possibly go wrong...

A couple of years ago, I picked up a nice set of polished aluminium fuel caps to go in front of the windscreen where they should be. I've been looking forward to putting these in. First up, we spent a fair bit of time drawing some marks on the body to make sure they're both symmetrical. I then cut out a template and set it up.


After a dead Dremel and more cutting, it was done.  Here's a test fit. I wedged some spacers underneath to lift the fuel cap. Unfortunately, the flat panel that the fuel cap bolts to slopes downwards slightly on this car, so we will make up spacers to get the fuel fillers level and at the correct height.


Yesterday, I did the passenger's side, welded in additional bars to bolt the fuel caps to and cut out a bit more clearance around them so that the front can hinge open without fouling on them. I'm pretty happy with the result. I'll bolt them in once the front end is in the correct position and the aluminium sheet is in.


Friday 13 October 2017

It's time to get on with it!


Well, it's been a very long time between posts. A lot has happened for Dad, Tim and I during that time. Tim has been buried in studies and I have been busy with family, work trips away and this purchase....


Unfortunately the GT40 has sat gathering dust. Finally, a couple of weeks ago, the planets aligned and we were all free to pull it out and do some work on it.

First up, we started her up. Yep, the 350 still runs.

Next, we decided it was time to put the roof back on. This has been sitting around the back of the house for years.


It turns out the firewall fouls on some of the extra bracing we added, but we had already decided that the fibreglass firewall would be replaced with Aluminium.


After a short session with the angle grinder..


 We've left a small amount of the fibreglass in place that we will seal against the new aluminium firewall.

The next job was to build a frame around the front of the engine. Originally the car had a small cup fitted over the nose of the water pump, right near the driver's left elbow. We want to improve on this with a flat firewall. Here's the frame tacked in place.


And that was the end of day 1. She looks so much better with the roof back on.


After a bit of thought, we soon decided that we were not happy with the new frame. It eats up far too much of the limited cabin space. Our solution was to install an electric water pump and relocate the alternator to the lower right hand side. We've also decided that we will be installing an electric compressor for the air conditioning up the front. 

Within a week, I had this Davies Craig EWP-150 with SBC relocation kit on my door step. 


Julian approves...


So on the next weekend, I removed the old mechanical pump with some help from an offsider. Believe it or not, she was only a few weeks old when we started the 350 for the first time. She's now 4...


There is plenty of room to install the new pump behind the driver's seat.


So on week 3, we got stuck into the remaining panelling. Tim did most of the work, while I finished off the damn fiddly passenger's side wheel arch.


I then started to look into the fuel fillers which I picked up a few years back. Originally this car had a fuel filler in the rear under the clamshell, but we will be installing them each side in front of the windscreen like they should be. We will need to cut out holes in the front body to fit the new fillers. I soon discovered that the front body has warped or its mounting points have moved a bit with the modifications we made to front end. We need to get this back into the correct position so that we cut holes in the right spot for the fuel fillers.

Last night, I ordered a pile of new goodies which are on their way to my door:
  • 140A alternator (required to power the air con compressor)
  • Alternator mounting bracket
  • Single crank pulley for ribbed belt (the old crank pulley is huge)
  • Engine air filter (finally)
Also, I picked up a handbrake mechanism from an R33 Nissan Skyline which should work well. Now that this has arrived, we can make up the centre tunnel and then get on with the rear firewall. 

It's been a long time, but we are enjoying getting stuck into the GT40 again. We just need to keep the momentum rolling now.